« Adventures » Unofficial Adventures
Unofficial Adventures
the Guild Master to submit your Adventures.
On the BattleLoreMaster forums you can discuss your Adventure ideas with other members, get them playtested, and hone them to perfection before submitting to the Guild Master.
The DoW Unofficial Adventures section holds more fan-made adventures made with their Adventure Editor.
Deliver the Message
Adventure by Jorge Molinari
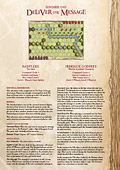 "A loud crash drowned the cries of the citizenry as another boulder hit the castle wall. The ground shook, and small pebbles from the ceiling gave off a glassy sound as they hit the marble floor. The aging scribe sat anxiously at his desk in the castle library. He was sweating heavily as he awaited Count Gervase. Some of the shelves had toppled over, and the floor was now littered with books and random debris from the broken decorations that had once adorned this elegant hall. Dawn had broken, and the small city of Juvage awoke to the sound of crashing boulders."
This has all been put together into a PDF document you can download here (772 Kb). Read the story, then play the adventure for yourself!
Gallowglass
13th Unar 3095
Adventure by Philip Thomas
 Astute observers will not the date is not in an Earth form: this is a fantasy battle from my own RPG, Illuvatade. I'll hand over to Colpi here, who was at the battle, for a brief background.
“Aye, there we were, prosecuting Holy War deep in enemy country, outnumbered, running out of supplies, and mutinous. So what better thing to do than split our forces? Narileth masterminded it all: I’ve never seen a wizard more skilled in warfare than him, may his soul rest in peace. One half dug in around the old execution ground at Gallowglass, with my lads standing shoulder to shoulder with Lady Daromiel’s archers: you can say what you like about the elves but they’re very good at shooting arrows. All our cavalry etc went in the other half, and what happened to them is a tale for another time...
The Amazons split their forces to match ours, with Lady Tabitha commanding the half which attacked us. Now, in the actual battle Lady Tabitha gave up pretty quickly when she’d gauged our position. You can have a go and see whether you think she was right...”
Illuvatade (Elves): Queen Daromiel
Level 1 Commander, Level 1 Wizard (Narileth), Level 1 Cleric (Narileth), Level 1 Warrior (Colpi Deepshaft), Level 1 Rogue (Mariana)
Victory Conditions: 6 Banners
Amazon: Lady Tabitha
First Player
Level 2 Commander, Level 1 Cleric (Lady Tabitha)
Victory Conditions: 6 Banners
Special Rules
The Elves: Elven units can move through woods without terrain restrictions. The Elven Archers are in fact a Blue unit: they can move 1 and attack or 2 and not attack, and they deal 3 damage dice with their bows (which are standard Common Bows). Moreover, they have Short Swords, which they will use in close combat instead of the Bows.
The Amazons: All Amazon units move faster than normal. Green Infantry and Archers may move 3 spaces and not attack or 2 spaces and attack. Blue Infantry may move 2 spaces and attack
The Battle of Stirling Bridge
September 11, 1297
Adventure by Servando Miguel
 Just at the time the second bridge had been finished, Scottish scouts were noticed by English workers. Both armies have moved fast to the bridges. It’s an unconfortable enviroment for the battle, but William Wallace is leading the Scottish and everybody know that he carries a hammer as big as a horse and he can throw big stones as far as a crossbow’s bolt. May he find a better use for the stones that were used for building the second bridge...
All is ready for the battle. Today the fate of England and Scotland will be decided.
English: King Edward I of England
First Player
Custom war council with 6 Lore Master tokens
Victory Conditions: 6 Banners
(as long as the bottom bridge is held it counts as a Victory Banner)
Scottish: William Wallace (Hill Giant)
Custom war council with 5 lore tokens (the Creature must be at level 1, the Commander up to level 2)
Victory Conditions: 6 Banners
(as long as the top bridge is held it counts as a Victory Banner)
Special Rules
To melee from/to a bridge a unit must be on the colored hex matching the bridge. When the Hill Giant is killed, one dwarf unit on the same section as the giant becomes a normal unit.
The Battle of Lincoln
February 2, 1141
Adventure by Philip Thomas
 Another battle from The Ordnance Survey Complete Guide to the Battlefields of Britain, the Battle of Lincoln was the major battle of the Civil War between King Stephen of England and Henry I’s daughter Matilda (Matilda was not present however). In the actual battle, Stephen was captured.
The Battle of the Standard was fought in 1138 during the reign of King Stephen. King Stephen’s throne was challenged by his rival Matilda, and King David of Scots as Matilda’s uncle took an interest in the matter. Or maybe he was just up to the old Scots game of border raiding. Anyway he led an army into England, and in County Durham the Archbishop of York met it with another army, carrying The Standard, actually a number of different banners associated with local saints. The English won the battle, but King David later conquered Northern England anyway.
The two forces in this battle are identical, but I have given the Rebels a level 2 commander because they have an impassable river at their back and tricky objectives. This may not balance.
For details of the Battle of Lincoln, see here.
War Council rules are not used unless you wish to experiment with magic in the battle.
Royals: King Stephen
Level 1 Commander
Victory Conditions: 5 Banners
Rebels: Earl Robert of Gloucester
First Player
Level 2 Commander
Victory Conditions: Take King Stephen by destroying the enemy Heavy Infantry unit, or get 7 Banners.
The Battle of the Standard
August 22, 1138
Adventure by Philip Thomas
 Once you have lifted one historic battle from The Ordnance Survey Complete Guide to the Battlefields of Britain, it’s tempting to lift another. This one possibly isn’t so well known, so I’ll just give a brief history lesson.
The Battle of the Standard was fought in 1138 during the reign of King Stephen. King Stephen’s throne was challenged by his rival Matilda, and King David of Scots as Matilda’s uncle took an interest in the matter. Or maybe he was just up to the old Scots game of border raiding. Anyway he led an army into England, and in County Durham the Archbishop of York met it with another army, carrying The Standard, actually a number of different banners associated with local saints. The English won the battle, but King David later conquered Northern England anyway.
For details of the Battle of the Standard, sometimes called the Battle of Northallerton, see here.
War Council rules are not used unless you wish to experiment with magic in the battle.
English: Archbishop Thurston of York
Level 1 Commander
Victory Conditions: 6 Banners
Scots: King David I
First Player
Level 1 Commander
Victory Conditions: 6 Banners
Unit Deployment
The English army deploys at the bottom of the map and contains 2 Red Infantry, 4 Blue Infantry, 4 Green Infantry and 3 Archers, and 2 Blue Cavalry who start the scenario off-map.
Place the three archers on the three hills in the third row from the bottom. On the second row from the bottom, counting in from the left, leave one hex empty and then place: Light Infantry, Light Infanty, Medium Infantry, Medium Infantry, Heavy Infantry, Heavy Infantry, Medium Infantry, Medium Infantry, Light Infantry, Light Infantry (these are deployed on the map shown).
The English Cavalry are off map. At any time at which he gives an order, the English player may, instead of ordering an on-map unit, order an off map unit to appear in the first row in the sector specified by the order card (or one of his choice if the order card is generic). That counts as the ordered units movement for that turn, and it may fight in the Combat step if it is now adjacent to an enemy.
One of the Red units (English player choses) is carrying the Standard, place a token with it. It is Bold. If this unit is killed, it is worth 2 Banners to the Scots.
The Scots Army deploys at the top of the map and contains 5 Blue Infantry, 7 Green Infantry, 4 Archers and 1 Blue Cavalry. It is divided into four parts. The Scottish player chooses where to deploy them, within the limits given for each.
The Vanguard (Galwegians) consist of 1 Archer and 3 Green Infantry and must be deployed in the Centre in the 3rd row from the top.
The Right Flank, under Prince Henry, consists of 1 Blue Cavalry and 4 Blue Infantry and goes on the hill in that flank, with the Cavalry in the front.
The Left Flank (Highlanders) has 3 Archers and 1 Green Infantry, and must be deployed on that flank, no further forward than the 2nd row from the top.
The Reserve (King David) has 3 Green Infantry 1 Blue Infantry and can go anywhere in the 1st row from the top.
The Battle of Hastings
October 14, 1066
Adventure by Philip Thomas
 This adventure follows the account in The Ordnance Survey Complete Guide to the Battlefields of Britain which says the forces were numerically equal and gives a roughly 2/7 proportion of Anglo-Saxon housecarls to fyrd troops. I have equated housecarls to heavy infantry and the fyrd to a mixture of light and medium infantry.
Norman infantry were either light skirmishers or more heavily armed but still not as well armed as the housecarls: green or blue infantry therefore. I have gone with Medium Cavalry for the Normans because they were nothing like as heavily armoured as the cavalry of later centuries: also as they are charging uphill the extra weight would merely slow them down. The Normans are the only ones with archers: if any Saxon archers were at Hastings they seem to have played a very small part in the battle.
Terrain-wise I have ignored the wood on the Anglo-Saxon right and the hill immediately behind the Normans, choosing to represent the impassable nature of the Anglo-Saxon flanks by the edge of the map. The tremendous defensive strength of the Anglo-Saxon position is offset slightly by the Norman archers and the higher commander rating of Duke William.
For details of the Battle of Hastings, see here.
War Council rules are not used unless you wish to experiment with magic in the battle.
Anglo-Saxons: King Harold Godwinson
Level 1 Commander
Victory Conditions: 7 Banners
Normans: Duke William the Bastard
First Player
Level 2 Commander
Victory Conditions: 7 Banners
Unit Deployment
The Anglo-Saxons have 6 Heavy Infantry, 7 Light Infantry and 8 Medium Infantry, deployed as the player chooses along the 2nd and 3rd rows from the top. The Heavy Infantry (housecarls) must go in the 3rd row, but the others (fyrdmen) can go in either.
The Normans are arrayed in 3 columns, one on each flank and one in the centre. The flank columns are 6 units in rows of 2, the front rank being a Light Infantry and an Archer, the middle rank 2 Medium Infantry and the back rank 2 Medium Cavalry. These ranks rest on the 1st, 2nd and 3rd hex from the bottom of the map, as do those for the centre column, which has 9 units, with 2 Light Infantry and an Archer in front, 3 Medium Infantry in the middle rank, and 3 Medium Cavalry in the back rank. Provided the troops are arranged in columns in the areas and rows described, the Norman player may place them as he likes.
To the Rescue!
Adventure by Niels Taatgen
 Things have never been civil between the Goblins and the Humans, but recently the militia of Les Eysee have been clearing out the farmlands.
The Goblins have therefore enlisted the help of Gnolpof the Hill Giant. Gnolpof has only made the conflict worse though, and has not only harassed the farmers, but has also kidnapped the Major.
Now it is up to the town commander Francois du Pont to rout the goblins and free the major.
Goblins: Lustutz the Goblin commander
Level 1 Commander
Level 2 Cleric (goblin shaman)
Humans: Francois du Pont
First Player
Level 3 Commander
Level 2 Warrior
Victory Conditions: The goblins win if they gain six Banners. The humans win if they retrieve the Major of Les Eysee and bring him to the stronghold.
Special Rules
Remove the Portal, Greater Portal and Stealth cards from the game. The major can be rescued by moving a unit onto the badge. The unit can then carry the badge with it during movement. If the unit is destroyed, the badge stays where it is. If the unit with the major is moved into the stronghold, the humans win.
Battles Of The Fords Of Isen
I : Defending The Eyot
Adventure by Stephane Nolet
 [Download PDF 183Kb] Saruman is now ready for his war. Having poisoned the mind of King Théoden with the help of Grima Wormtongue’s evil schemes, the White Wizard knows that his main challenge is now to defeat the still powerful opposing leadership of two men: Éomer, first marshal of the Riddermark and the only son of Théoden, Théodred, second marshal.
Neutralizing these two leaders is the foremost priority of Isengard early in the campaign. Saruman already knows that young Théodred was sent to defend the fords of the river Isen so he decides to dispatch his best troops to assault this important passage and, more importantly, kill Théoden’s son at all cost.
Uruk-Hai, Warg riders and men from Dunland are descending on both sides of the river and Théodred’s cavalry rushes to makes contact with this fierce enemy. The battle is bloody and Théodred decides to retreat to the fords where the river splits and rejoins, forming a small stony eyot. There, with some faithful leaders like Grimbold and a handful of loyal units, he will defend and deny the entry to his beloved land, with the hope that Éomer, or any other, will soon come to his rescue.
Théodred, Son Of Théoden, Second Marshal Of The Riddermark
Command Cards: 3 (+1 at the end of the 8th turn)
Victory Conditions: 5 Banners
Saruman the White
First Player
Command Cards: 6
Victory Conditions: 5 Banners
Special Rules
The Arrival Of Elfhelm: At the end of each of his turn, the Rohan player collects one Lore Token. The only purpose of those tokens is to mark the number of turns completed from the beginning of the game. When the eighth token is collected, place one red cavarly and one blue cavalry units anywhere, at the Rohan player’s choice, on the easternmost row of hexes. In addition to this, the Rohan player can draw one more Command Card, for a maximum of 4.
An alternative way to make Elfhelm arrive, wich is more random and uncertain, is to collect one Lore token for each Lore symbol rolled on Rohan’s combat dice. When the sixth token is collected, this signals the arrival of Elfhelm (to be set up at the end of the turn, as described earlier).
Uruk-Hai and Dunlendings: In this scenario, the Uruk-Hai are represented on the board by Goblin figures. They must be played with the same rules that apply to Goblins. The Dunlendings are represented by human figures and have no special abilities.
Killing Théodred: Eliminating the unit marked with the name Théodred on the map is worth 2 flags for the Isengard player.
Retreats: The Rohan player must always retreat toward the eastern edge of the board. The Isengard player has a little more flexibility. As Saruman controls both side of the river Isen, his troops can retreat toward both edges following this rule: units on the center row of hexes and on any hexes west of that row retreat to the west. Units east of the center row retreat to the east.
The Battle of Jemmingen
July 21, 1568 (Eighty Year’s War)
Adventure by Servando Miguel
 After the Battle of Heiligerlee Louis of Nassau failed to capture the city of Groningen.
Now the battle is at Jemmingen, and he is going to battle the Spanish army, lead by Fernando Álvarez de Toledo, Duke of Alba.
The Duke of Alba doesn’t yet know the surprise that Nassau brings from the Swiss hills ...
Dutch: Heiligerlee Louis of Nassau
First Player
Custom war council with 7 Lore Master tokens (including 2 for the Hill Giant).
Victory Conditions: 6 Banners
Spanish: Fernando Álvarez de Toledo, Duque de Alba
Custom war council with 7 lore tokens (including 2 to summon the Earth Elemental). The Council must include a cleric of at least Level 1 (they battle in the name of God).
Victory Conditions: 6 Banners